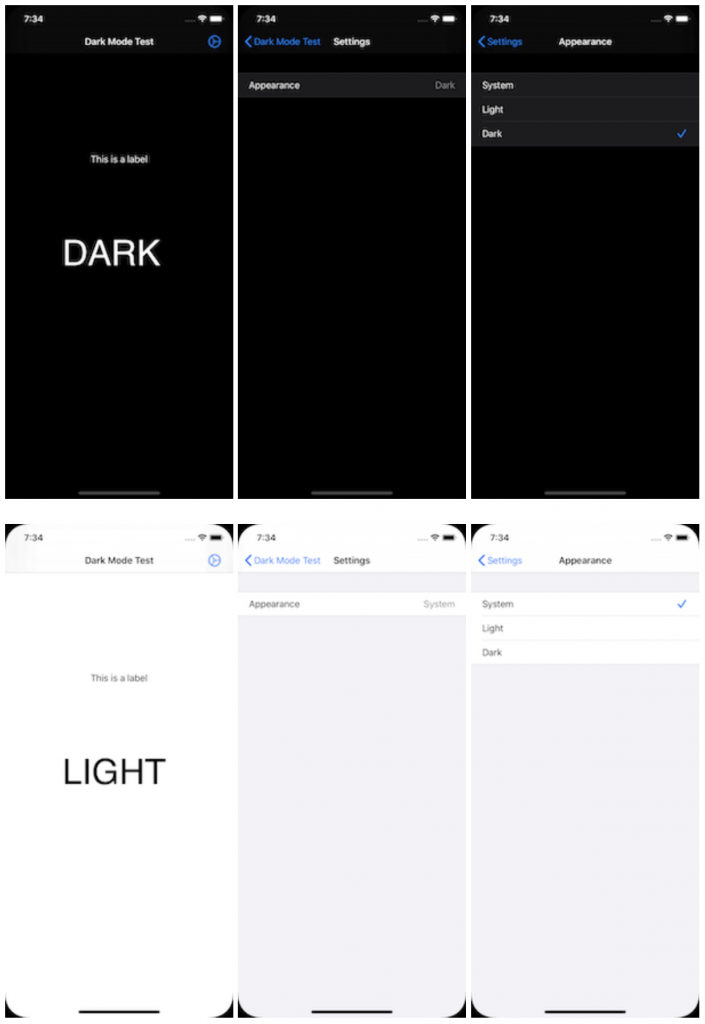
Here is a DarkModeDemo I created to play around with Dark Mode on iOS 13. I wanted to allow a user to override the system setting with dark or light. Maybe the users wants the system to be light but this particular app to be dark.
Screenshots:

Here is a DarkModeDemo I created to play around with Dark Mode on iOS 13. I wanted to allow a user to override the system setting with dark or light. Maybe the users wants the system to be light but this particular app to be dark.
Screenshots:
Here is a small function that will validate a US Zip Code using a Regexp with a: NSPredicate in Swift.
func validate(input: String?) -> Bool {
guard let input = input else { return false }
return NSPredicate(format: "SELF MATCHES %@", "^\\d{5}(?:[-\\s]?\\d{4})?$")
.evaluate(with: input.uppercased())
}
Playground: zip-code-validation-playground
Comments closedCharles “is an HTTP proxy / HTTP monitor / Reverse Proxy that enables a developer to view all of the HTTP and SSL / HTTPS traffic between their machine and the Internet. This includes requests, responses and the HTTP headers (which contain the cookies and caching information).”
It is one of my favorite tools for debugging network applications. It supports Mac, Windows, Linux and even iOS.
The instructions on their website for SSL connections from within iPhone applications are not quite complete. Especially the last step which is tricky and I often forget. Here are complete instructions for SSL proxy connections on the iOS Simulator.
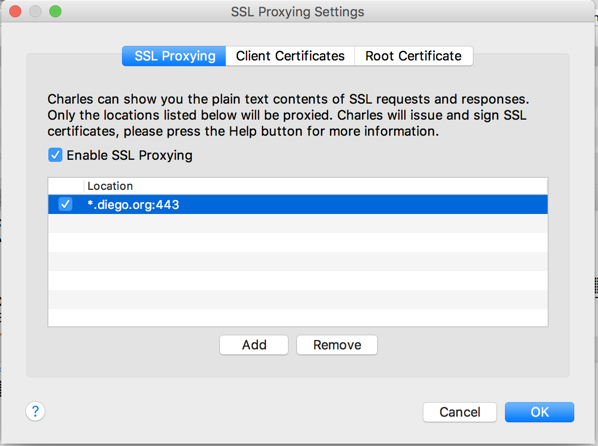
1. Add SSL Location. After launching Charles, open the menu:
Proxy > SSL Proxying Settings
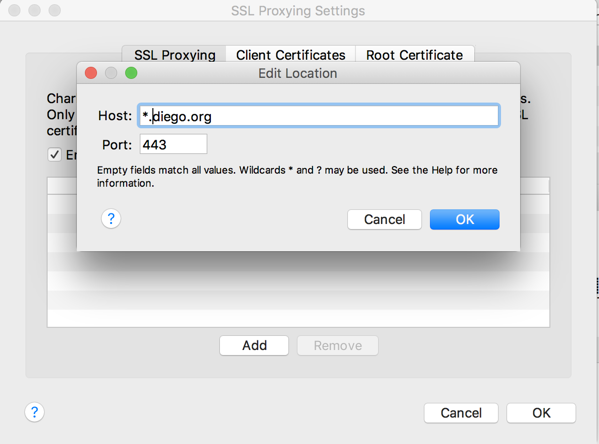
The click the “Add Button”
Type in the location you want to add. You can use wildcards if you like. When you’re done, you should see you location in the list:
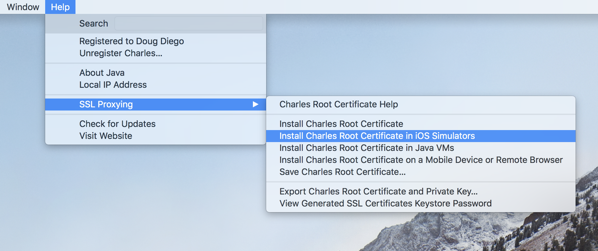
2. Install Charles Root Certificate in iOS Simulators. Open the menu:
Help > Install Charles Root Certificate in iOS Simulators
This will install the Charles Root Certificate on the Simulator.
3. Enable the Root Certificate. This is the step, they forget to document. And the last part of it is tricky.
On the Simulator, go to:
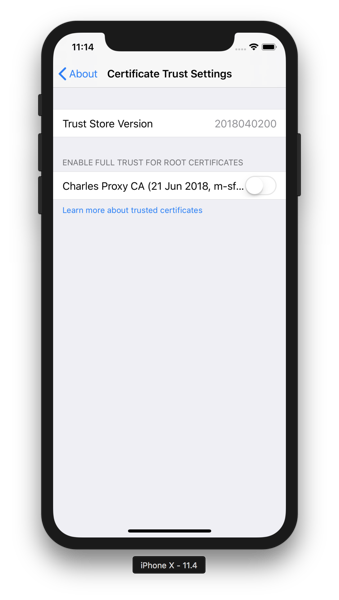
Settings > General > About > Certificate Trust Settings
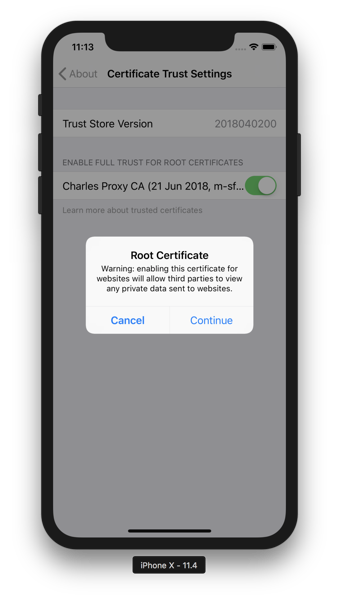
Swipe the switch to enable the certificate. It will give a warning which you must choose “Continue”
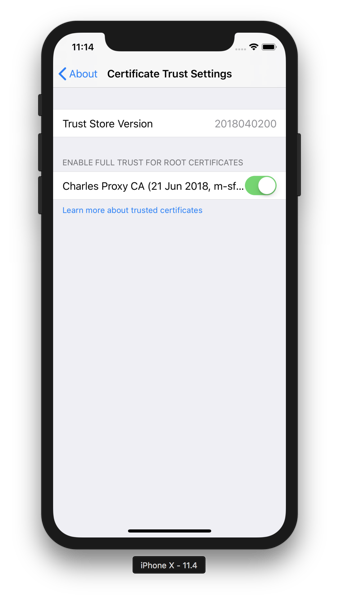
You’ll be placed back on the Certificate Trust Settings page with the switch on:
Now is the critical part. Quit the Simulator. Now run your application again and Charles will be able to decrypt your network communications.
Comments closedIn iOS 7, Apple added an option to UIScrollView which could allow you to dismiss the keyboard when dragged.
UIScrollViewKeyboardDismissMode
public enum UIScrollViewKeyboardDismissMode : Int {
case none
case onDrag // dismisses the keyboard when a drag begins
case interactive // the keyboard follows the dragging touch off screen, and may be pulled upward again to cancel the dismiss
}
This is very easy to do. Just set the keyboardDismissMode property to .onDrag or interactive:
let tableView = UITableView(frame: .zero, style: .plain)
tableView.keyboardDismissMode = .interactive
You should set this on all tableviews that contain text fields.
For example code, see: https://github.com/dougdiego/iOSDemos
Comments closedI had a need to programmatically select a row in a UITableView. In order to do this, you have to do two things:
let indexPath = IndexPath(row: 0, section: 0)
self.tableView.selectRow(at: indexPath, animated: true, scrollPosition: .none)
self.tableView.delegate?.tableView!(self.tableView, didSelectRowAt: indexPath)
selectRow highlights the selected row and didSelectRowAt will call didSelectRowAt if you need to perform whatever action you defined.
For example code, see: https://github.com/dougdiego/iOSDemos
Comments closedWhile working on a new Xcode project, I was unable to get my crash logs on Crashlytics . In the Crashlytics dashboard, I would see the following error:
"Found 1 unsymbolicated crash from missing dSYMs in 1 version in the last 24 hours"
Crashlytics even had a page dedicated to this: All about Missing dSYMs.
In my case the issue was with bitcode being enabled, which it is by default on all new iOS Projects. When bitcode is enabled, Apple recompiles your project on their server. Then you need to download the dSYMS to your computer and upload them to Crashlytics. This is a manual process that takes a lot of time. I was dreading doing this a second time after figuring out the process.
I figured this is something that fastlane might be able to help me with. Sure enough, they’ve come up with a lane to automate this. You can read more about it here:
Simply add this to your Fastfile:
lane :refresh_dsyms do
download_dsyms # Download dSYM files from iTC
upload_symbols_to_crashlytics # Upload them to Crashlytics
clean_build_artifacts # Delete the local dSYM files
end
Then run it like this:
fastlane refresh_dsyms
Thanks fastlane!
Comments closedSometimes you have a need to wait on several asynchronous tasks before doing something in your code. DispatchGroup is a powerful API that lets you group together these tasks into one task.
DispatchGroup allows for aggregate synchronization of work. You can use them to submit multiple different work items and track when they all complete, even though they might run on different queues. This behavior can be helpful when progress can’t be made until all of the specified tasks are complete.
For example you have a ViewController that shows data from three different APIs. You need data from all 3 API’s before you can render the page. One way to do this would be to chain network calls and render the page after the 3rd API completed. But this leads to ugly nest code and requires that the APIs be called synchronously, rather than asynchronously.
Let’s looks look at how to solve this problem by chaining first.
I’ll be using httpbin.org for these examples. It’s a great tool for testing HTTP requests and responses.
This URL allows you to make an HTTP request that will wait a duration in seconds. For example, this will take 10 seconds to load:
https://httpbin.org/range/1024?duration=10
I’m using this API so you can easily see the time difference.
I wrote a simple method called makeNetworkRequest(), which take a duration in seconds and uses NSURLSession to call httpbin.org:
func makeNetworkRequest(duration:Int, completion: @escaping (_ result: String?) -> Void) {
let config = URLSessionConfiguration.default
let session = URLSession(configuration: config)
let url = URL(string: "https://httpbin.org/range/1024?duration=\(Int(duration))")!
NSLog("makeNetworkRequest() \(url)")
let task = session.dataTask(with: url) { (data, response, error) in
if error != nil {
NSLog(error!.localizedDescription)
completion(nil)
} else {
if let str = String(data: data!, encoding: String.Encoding.utf8) {
completion(str)
} else {
completion(nil)
}
}
}
task.resume()
}
Here is an example using nesting:
makeNetworkRequest(duration: 2) { (str) in
NSLog("Request #1 \(str ?? "nil"))\n")
makeNetworkRequest(duration: 3) { (str) in
NSLog("Request #2 \(str ?? "nil"))\n")
makeNetworkRequest(duration: 10) { (str) in
NSLog("Request #3 \(str ?? "nil"))\n")
NSLog("Done!")
}
}
}
As you can see this accomplishes a solution to our problem, but there is a lot of nested code and called the API’s synchronously. It took 15 seconds to wait for all 3 responses.
Now let’s try this with DispatchGroup. With DistpatchGroup you first create a DistpachGroup:
let group = DispatchGroup()
For each block of code you want to execute you call:
group.enter()
Before the API and then
Group.leave()
When it finishes executing.
Finially group.notifiy(…) will be called when all group.enter() calls have a successful group.leave() response:
group.notify(queue: DispatchQueue.global(qos: .background)) {
NSLog(“All 3 network reqeusts completed”)
completion(strings)
}
Here’s a complete example:
func makeNetworkRequests(completion: @escaping (_ result: String?) -> Void) {
let group = DispatchGroup()
var strings = "start"
group.enter()
makeNetworkRequest(duration: 2) { (str) in
NSLog("Request #1 \(str ?? "nil"))\n")
if let str = str {
strings = strings + str
}
group.leave()
}
group.enter()
makeNetworkRequest(duration: 3) { (str) in
NSLog("Request #2 \(str ?? "nil"))\n")
if let str = str {
strings = strings + str
}
group.leave()
}
group.enter()
makeNetworkRequest(duration: 10) { (str) in
NSLog("Request #3 \(str ?? "nil"))\n")
if let str = str {
strings = strings + str
}
group.leave()
}
group.notify(queue: DispatchQueue.global(qos: .background)) {
NSLog("All 3 network reqeusts completed")
completion(strings)
}
}
Notice how much easier this code is to read. No more nested blocks. It’s also asynchronous. It only takes 10 seconds for all 3 to return, because we’re only waiting on the longest API to respond.
For example code, see: https://github.com/dougdiego/iOSDemos
Comments closedI came across a bug the other day because of photos in the iCloud Photo Library. In my app I was showing a grid of images to be selected. If “iCloud Photo Library” was enabled then user could see the thumbnail and pick the image, but the app failed when it tried to do something with the image. This is because the image wasn’t downloaded yet.
This is what my code looked like.
let manager = PHImageManager.default()
let requestOptions = PHImageRequestOptions()
requestOptions.resizeMode = .exact
requestOptions.deliveryMode = .highQualityFormat;
// Request Image
manager.requestImageData(for: asset, options: requestOptions, resultHandler: { (data, str, orientation, info) -> Void in
// Do somethign with Image Data
})
I found the property: PHImageRequestOptions.isNetworkAccessAllowed. When enabled, the image is downloaded from iCloud. And you can set a progressHandler to inform the user.
I updated the code to look like:
let manager = PHImageManager.default()
let requestOptions = PHImageRequestOptions()
requestOptions.resizeMode = .exact
requestOptions.deliveryMode = .highQualityFormat;
requestOptions.isNetworkAccessAllowed = true;
requestOptions.progressHandler = { (progress, error, stop, info) in
if(progress == 1.0){
SVProgressHUD.dismiss()
} else {
SVProgressHUD.showProgress(Float(progress), status: "Downloading from iCloud")
}
}
// Request Image
manager.requestImageData(for: asset, options: requestOptions, resultHandler: { (data, str, orientation, info) -> Void in
// Do somethign with Image Data
})
The requestImageData API, returns an info dictionary providing information about the status of the request. Documentation on the key is here:
PHImageManager -Image Result Info Keys
PHImageResultIsInCloudKey A Boolean value indicating whether the photo asset data is stored on the local device or must be downloaded from iCloud.
You could also check this key to see if downloading the image is required.
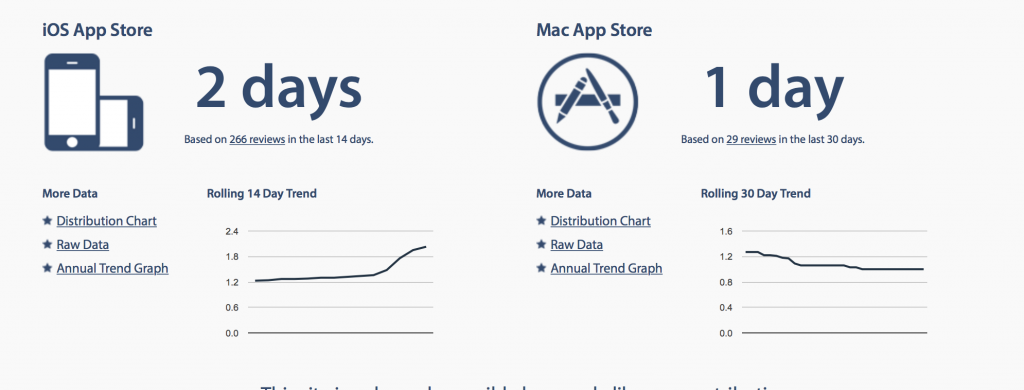
Comments closedRecently Apple shortened their review times from about 7 days to about 1 day.
You can follow the latest review times at appreviewtimes.com
How is Apple doing this? It could be new leadership. It could policy changes. It could be more people. While it may be all of these, I think it has something to do Automation.
Each year Apple has been getting better with their testing tools. In iOS 9, they made a big improvement with UI Testing tools. Xcode now allows you to record your UI Tests. Basically click a record button and then navigate your app in the Simulator. It’s a bit more complicated than that, but almost that easy.
What if Apple modified their testing tools, so the App Store Review team could record their review sessions. Once they have a recording for an app, they can run that recording on new submissions. If it passes, they approve the App. If it fails, they give the app a quick look through and fix the UI test.
They could have started recording session months in advance and then all of a sudden turned it on. If an App hadn’t been approved in a while or it was a new app, the first review would take longer. But after that, it would be fast.
I have no idea if this is what they are really doing, just fun speculation. I hope we’ll learn more at WWDC 2016.
Comments closedHere are few tips I learned when setting up Fastlane Frameit.
When I first ran fame it, I got this error:
$ frameit white
iconv: /Users/doug/src/my-ios-project/fastlane/screenshots/en-US/title.strings:1:252: incomplete character or shift sequence
[16:37:51]: Could not get title for screenshot ./iPhone6-0.png. Please provide one in your Framefile.json
iconv: /Users/doug/src/my-ios-project/fastlane/screenshots/en-US/title.strings:1:252: incomplete character or shift sequence
[16:37:52]: Could not get title for screenshot ./iPhone6-1.png. Please provide one in your Framefile.json
iconv: /Users/doug/src/my-ios-project/fastlane/screenshots/en-US/title.strings:1:252: incomplete character or shift sequence
[16:37:53]: Could not get title for screenshot ./iPhone6-2.png. Please provide one in your Framefile.json
ç
iconv: /Users/doug/src/my-ios-project/fastlane/screenshots/en-US/title.strings:1:252: incomplete character or shift sequence
[16:37:55]: Could not get title for screenshot ./iPhone6-3.png. Please provide one in your Framefile.json
√
iconv: /Users/doug/src/my-ios-project/fastlane/screenshots/en-US/title.strings:1:252: incomplete character or shift sequence
[16:37:56]: Could not get title for screenshot ./iPhone6-4.png. Please provide one in your Framefile.json
As the documentation clear states: “.strings files MUST be utf-16 encoded (UTF-16 LE with BOM).”
I fixed this by saving the file ast UTF-16 in TextWrangler.
Then I ran into a strange error:
$ frameit white
[16:42:10]: `mogrify -gravity Center -pointsize 55 -draw text 0,0 ‘Text 1′ -fill #000000 /var/folders/rf/yz3fgzq17sbgkjcxfq_x6lh40000gn/T/mini_magick20160324-45310-1yizv31.png` failed with error:
mogrify: unable to read font `(null)’ @ error/annotate.c/RenderFreetype/1153.
mogrify: non-conforming drawing primitive definition `text’ @ error/draw.c/DrawImage/3165.
[16:42:12]: `mogrify -gravity Center -pointsize 55 -draw text 0,0 ‘Text 2′ -fill #000000 /var/folders/rf/yz3fgzq17sbgkjcxfq_x6lh40000gn/T/mini_magick20160324-45310-qp00up.png` failed with error:
mogrify: unable to read font `(null)’ @ error/annotate.c/RenderFreetype/1153.
mogrify: non-conforming drawing primitive definition `text’ @ error/draw.c/DrawImage/3165.
[16:42:13]: `mogrify -gravity Center -pointsize 55 -draw text 0,0 ‘Text 3′ -fill #000000 /var/folders/rf/yz3fgzq17sbgkjcxfq_x6lh40000gn/T/mini_magick20160324-45310-eu9yaq.png` failed with error:
mogrify: unable to read font `(null)’ @ error/annotate.c/RenderFreetype/1153.
mogrify: non-conforming drawing primitive definition `text’ @ error/draw.c/DrawImage/3165.
[16:42:15]: `mogrify -gravity Center -pointsize 55 -draw text 0,0 ‘Text 4′ -fill #000000 /var/folders/rf/yz3fgzq17sbgkjcxfq_x6lh40000gn/T/mini_magick20160324-45310-1ie72eo.png` failed with error:
mogrify: unable to read font `(null)’ @ error/annotate.c/RenderFreetype/1153.
mogrify: non-conforming drawing primitive definition `text’ @ error/draw.c/DrawImage/3165.
[16:42:16]: `mogrify -gravity Center -pointsize 55 -draw text 0,0 ‘Text 5′ -fill #000000 /var/folders/rf/yz3fgzq17sbgkjcxfq_x6lh40000gn/T/mini_magick20160324-45310-ji9gyl.png` failed with error:
mogrify: unable to read font `(null)’ @ error/annotate.c/RenderFreetype/1153.
mogrify: non-conforming drawing primitive definition `text’ @ error/draw.c/DrawImage/3165.
I came across a forum thread that said I needed to install ghostscript. So I installed Ghostscript with Homebrew like:
$ brew install gs
==> Installing dependencies for ghostscript: libtiff, little-cms2
==> Installing ghostscript dependency: libtiff
==> Downloading https://homebrew.bintray.com/bottles/libtiff-4.0.6.el_capitan.bottle.tar.gz
######################################################################## 100.0%
==> Pouring libtiff-4.0.6.el_capitan.bottle.tar.gz
🍺 /usr/local/Cellar/libtiff/4.0.6: 259 files, 3.4M
==> Installing ghostscript dependency: little-cms2
==> Downloading https://homebrew.bintray.com/bottles/little-cms2-2.7.el_capitan.bottle.tar.gz
######################################################################## 100.0%
==> Pouring little-cms2-2.7.el_capitan.bottle.tar.gz
🍺 /usr/local/Cellar/little-cms2/2.7: 16 files, 1M
==> Installing ghostscript
==> Downloading https://homebrew.bintray.com/bottles/ghostscript-9.18.el_capitan.bottle.tar.gz
######################################################################## 100.0%
==> Pouring ghostscript-9.18.el_capitan.bottle.tar.gz
🍺 /usr/local/Cellar/ghostscript/9.18: 709 files, 61M
Then it ran successfully:
$ frameit white
[16:45:21]: Added frame: ‘/Users/doug/src/my-ios-project/fastlane/screenshots/en-US/iPhone6-0_framed.png’
[16:45:23]: Added frame: ‘/Users/doug/src/my-ios-project/fastlane/screenshots/en-US/iPhone6-1_framed.png’
[16:45:25]: Added frame: ‘/Users/doug/src/my-ios-project/fastlane/screenshots/en-US/iPhone6-2_framed.png’
[16:45:28]: Added frame: ‘/Users/doug/src/my-ios-project/fastlane/screenshots/en-US/iPhone6-3_framed.png’
[16:45:30]: Added frame: ‘/Users/doug/src/my-ios-project/fastlane/screenshots/en-US/iPhone6-4_framed.png’
Comments closed