Skip to content →

Category: Code

DispatchGroup with Swift

Sometimes you have a need to wait on several asynchronous tasks before doing something in your code. DispatchGroup is a powerful API that lets you group together these tasks into one task.

DispatchGroup allows for aggregate synchronization of work. You can use them to submit multiple different work items and track when they all complete, even though they might run on different queues. This behavior can be helpful when progress can’t be made until all of the specified tasks are complete.

For example you have a ViewController that shows data from three different APIs. You need data from all 3 API’s before you can render the page. One way to do this would be to chain network calls and render the page after the 3rd API completed. But this leads to ugly nest code and requires that the APIs be called synchronously, rather than asynchronously.

Let’s looks look at how to solve this problem by chaining first.

I’ll be using httpbin.org for these examples. It’s a great tool for testing HTTP requests and responses.

This URL allows you to make an HTTP request that will wait a duration in seconds. For example, this will take 10 seconds to load:
https://httpbin.org/range/1024?duration=10

I’m using this API so you can easily see the time difference.

I wrote a simple method called makeNetworkRequest(), which take a duration in seconds and uses NSURLSession to call httpbin.org:


    func makeNetworkRequest(duration:Int, completion: @escaping (_ result: String?) -> Void) {
        let config = URLSessionConfiguration.default
        let session = URLSession(configuration: config)
        let url = URL(string: "https://httpbin.org/range/1024?duration=\(Int(duration))")!
        NSLog("makeNetworkRequest() \(url)")
        let task = session.dataTask(with: url) { (data, response, error) in
            if error != nil {
                NSLog(error!.localizedDescription)
                completion(nil)
            } else {
                if let str = String(data: data!, encoding: String.Encoding.utf8) {
                    completion(str)
                } else {
                    completion(nil)
                }

            }
        }
        task.resume()
    }


Here is an example using nesting:


makeNetworkRequest(duration: 2) { (str) in
	NSLog("Request #1 \(str ?? "nil"))\n")

	makeNetworkRequest(duration: 3) { (str) in
		NSLog("Request #2 \(str ?? "nil"))\n")

		makeNetworkRequest(duration: 10) { (str) in
			NSLog("Request #3 \(str ?? "nil"))\n")
			
			NSLog("Done!")
		}
	}
}

As you can see this accomplishes a solution to our problem, but there is a lot of nested code and called the API’s synchronously. It took 15 seconds to wait for all 3 responses.

Now let’s try this with DispatchGroup. With DistpatchGroup you first create a DistpachGroup:

let group = DispatchGroup()

For each block of code you want to execute you call:

group.enter()

Before the API and then

Group.leave()

When it finishes executing.

Finially group.notifiy(…) will be called when all group.enter() calls have a successful group.leave() response:

group.notify(queue: DispatchQueue.global(qos: .background)) {
NSLog(“All 3 network reqeusts completed”)
completion(strings)
}

Here’s a complete example:


func makeNetworkRequests(completion: @escaping (_ result: String?) -> Void) {
        let group = DispatchGroup()
        var strings = "start"
        
        group.enter()
        makeNetworkRequest(duration: 2) { (str) in
            NSLog("Request #1 \(str ?? "nil"))\n")
            if let str = str {
                strings = strings + str
            }
            group.leave()
        }
        
        group.enter()
        makeNetworkRequest(duration: 3) { (str) in
            NSLog("Request #2 \(str ?? "nil"))\n")
            if let str = str {
                strings = strings + str
            }
            group.leave()
        }
        
        group.enter()
        makeNetworkRequest(duration: 10) { (str) in
            NSLog("Request #3 \(str ?? "nil"))\n")
            if let str = str {
                strings = strings + str
            }
            group.leave()
        }
        
        group.notify(queue: DispatchQueue.global(qos: .background)) {
            NSLog("All 3 network reqeusts completed")
            completion(strings)
        }
    }

Notice how much easier this code is to read. No more nested blocks. It’s also asynchronous. It only takes 10 seconds for all 3 to return, because we’re only waiting on the longest API to respond.

For example code, see: https://github.com/dougdiego/iOSDemos

Comments closed
Exporting Evernote to Markdown

I have been a Evernote user since 2008.  I’ve only used it for text notes, even though Evernote supports much more.  I’ve never had a need to upgrade because my text notes never came anywhere near the upload limit.  In fact the thousands of text notes I currently have is only about 5mb, which is way less than the 60mb a month upload limit.

A month ago Evernote changed their plan so that you could only access it from 2 devices.  This was a problem for me because I used a computer at work, at home and my iPhone.  It wasn’t worth it to me to pay $34.99 a year to sync text documents.  Maybe if I used the other features.  I looked for another solution.

Ideally I wanted to keep all my notes in Markdown in Dropbox.  There’s a number of app which do this.  I settled on nvALT on the Mac and 1Writer on iOS.  Next I had to get my notes from Evernote to Dropbox as Markdown.  Evernote does not support this.  Evernote only supports exporting as HTML or Evernote XML Format (.enex).

Atter searching around I came across an open source project on GitHub called: ever2simple.  It was designed for exporting Evernote to SimpleNote.  This did most of what I needed, except it named all the files it exported sequentially like: 1.txt, 2.txt, 3.txt, …   This wouldn’t work for me because the name of my files means something to me.  I needed it to export the files with the title I gave it in Evernote.

So I forked it: https://github.com/dougdiego/ever2simple Now it exports the files and names them the title that was given in Evernote.  It also handles files with the same title.  Feel free to download this script and use it.  Just follow the instructions.

Comments closed

ld: library not found for -lPods

I’ve had this error a few times, so I figured I’d document the solution for the next time it occurred.

When doing a build in Xcode, I got the following error:


ld: library not found for -lPods

My project is setup to use cocoapods.

First make sure you are using MyProject.xcworkspace and not MyProject.xcodeproj

For me this was the case.  But I realized that I just created a new configuration for “Ad Hoc” builds.  To fix the problem I had to install the Podfile again with the command:


pod install

After running pod infall, open the project: MyProject.xcworkspace, clean your project and build.  The error should go away.

Comments closed

AddressBookFiller for iOS

AddressBookFiller is a simple application which populates your address book with contacts. It is an updated version of my previous post.

This is useful when developing for the iOS and working on the emulator. On many occasions, I’ve spent quite a bit of time adding contacts to the emulator to test something. Then when I change emulator version, they all get erased. This is very frustrating. So I put together this simple application which allow you to programatically fill up your address book.

Currenly the address book is populated with U.S. Presidents. Values are set for:
* first name
* last name
* photo
* phone number
* birthday
* Address: street, city, state, zip

Source on Github: https://github.com/dougdiego/AddressBookFiller

Comments closed

Three20: Uploading an image to a server

Here’s an example to upload an image (or any data file) to a server:


– (void) uploadMediaForUserId: (NSString*) userId {
NSMutableDictionary *parameters = [NSMutableDictionary dictionaryWithObjectsAndKeys:
kAPIVersion, @"v",
nil];
// Media Name
if( TTIsStringWithAnyText(_mediaName)){
[parameters setObject:_mediaName forKey:@"n"];
}

// Media Description
if( TTIsStringWithAnyText(_mediaDescription)){
[parameters setObject:_mediaDescription forKey:@"d"];
}

// REST resource, where kMedia: @"/users/%@/media";
NSString *resource = [NSString stringWithFormat:kMedia, userId];

// Create the URL, where kServerURL is something like "http://www.dougdiego.com"
NSString *url = [kServerURL stringByAppendingFormat:@"%@?%@", resource, [parameters gtm_httpArgumentsString]];
// Resulting URL looks like: http://www.dougdiego.com/users/12345/media

TTURLRequest* request = [TTURLRequest requestWithURL:url delegate:self];
request.httpMethod = @"POST";

NSString * imageLocalUrl = [NSString stringWithFormat:@"documents://%@",_mediaFilename];
NSData *imageData = UIImageJPEGRepresentation(TTIMAGE(imageLocalUrl), 0.6);

// Set the media file with the parameter: file
[request addFile:imageData mimeType:@"image/jpeg" fileName:@"file"];

request.cachePolicy = TTURLRequestCachePolicyNoCache;
request.cacheExpirationAge = TT_CACHE_EXPIRATION_AGE_NEVER;

TTURLJSONResponse* response = [[TTURLJSONResponse alloc] init];
request.response = response;
TT_RELEASE_SAFELY(response);

[request send];
}
Comments closed

Three20: Swipe to delete

Need to implement Swipe to delete in your Three20 project? In order to do so, I added the 3 following methods to my datasource (TTListDataSource subclass):


– (BOOL) tableView: (UITableView *)tableView canEditRowAtIndexPath: (NSIndexPath *)indexPath {
return YES;
}

– (void)tableView:(UITableView *)tableView commitEditingStyle: (UITableViewCellEditingStyle)editingStyle forRowAtIndexPath:(NSIndexPath *)indexPath {
[tableView beginUpdates];
if (editingStyle == UITableViewCellEditingStyleDelete) {
// Make sure the row is there to delete
if([_myModel.messages count] >= indexPath.row){
// Get the object to delete
MyObject* myObject = [[_myModel.messages objectAtIndex:indexPath.row] retain];

// Remove the object, in my case this makes an API call
[self removeObjectById: myobject.id];

// Remove the object from the array
[_myModel.messages removeObjectAtIndex:indexPath.row];

// clean up
TT_RELEASE_SAFELY(myObject);
}
// Delete the row from the UITableView
[tableView deleteRowsAtIndexPaths:[NSArray arrayWithObjects:indexPath, nil] withRowAnimation:YES];
}
[tableView endUpdates];
}

– (NSInteger)tableView:(UITableView *)tableView numberOfRowsInSection:(NSInteger)section {
return [_myModel.messages count];
}

Note: before adding the numberOfRowsInSection method, I was getting NSInternalInconsistencyException errors.

Comments closed

Targeting the iPhone 4

Are you releasing a flashlight app for the iPhone 4 or writing an application that use the capabilities of a certain device? Apple provides a UIKit Dictionary key called UIRequiredDeviceCapabilities for this purpose.

Apple define this key as: UIRequiredDeviceCapabilities (Array or Dictionary – iOS) lets iTunes and the App Store know which device-related features an application requires in order to run. iTunes and the mobile App Store use this list to prevent customers from installing applications on a device that does not support the listed capabilities.

You set this key in the Info.plist. Here is an example which tells the App Store that your app requires a camera flash. You can use this if your app only runs on the iPhone 4:


UIRequiredDeviceCapabilities

camera-flash

More: UIKit Keys

Comments closed

iPhone Custom Fonts with FontLabel

Need to use your own custom font? Or you want to support a certain font that isn’t on older iPhonts? Check out the project FontLabel.

To use FontLabel:
1. Get a copy of the project: https://github.com/zynga/FontLabel.git

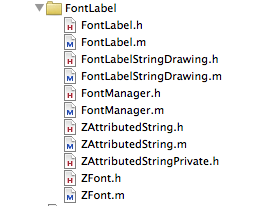
2. Add the files to your project:

3. Add a font file to your project. You can find several free fonts here: http://www.webpagepublicity.com/free-fonts.html

4. In your AppDelegate, add the import:

#import “FontManager.h”

And then load the font file in the didFinishLaunchingWithOptions:

– (BOOL)application:(UIApplication *)application didFinishLaunchingWithOptions:(NSDictionary *)launchOptions {
// Load Custom Fonts
[[FontManager sharedManager] loadFont:@”FuturaBoldBT”];
}

In my example, I used the font “FuturaBoldBT.ttf

5. Finally create a FontLabel, which is just a subclass of UILabel:


-(void) displayMyLabel {
FontLabel * myLabel = [[FontLabel alloc] initWithFrame:CGRectMake(10, 30, 50, 30)
fontName:@”FuturaBoldBT” pointSize:26.0f];
myLabel.textAlignment = UITextAlignmentCenter;
myLabell.textColor = UIColor.whiteColor;
[myLabel setBackgroundColor:UIColor.clearColor];
[self addSubview:myLabel];
}
Comments closed

sgx error (background gpu access not permitted)

I recently started seeing this error in my Cocos 2d iPhone application running on iOS 4.1:

sgx error (background gpu access not permitted):
Program received signal: “SIGABRT”.

After searching around, I found this thread on the cocos2d forum.

I modified my code in the ApplicationDelegate to look like:


– (void)applicationDidEnterBackground:(UIApplication *)application
{
[[CCDirector sharedDirector] stopAnimation];
}

– (void)applicationWillEnterForeground:(UIApplication *)application
{
[[CCDirector sharedDirector] startAnimation];
}

– (void)applicationWillResignActive:(UIApplication *)application
{
[[CCDirector sharedDirector] pause];
}

– (void)applicationDidBecomeActive:(UIApplication *)application
{
[[CCDirector sharedDirector] resume];
}

This solved my problem. I hope it helps someone else.

Comments closed

iPhone Development Helper: Fill up your Address Book

AddressBookFill is a simple application which populates your address book with contacts. This is useful when developing for the iPhone and working on the emulator.

On many occasions, I’ve spent quite a bit of time adding contacts to the emulator to test something. Then when I change emulator version, they all get erased. This is very frustrating. So I put together this simple application which allow you to programatically fill up your address book.

Currenly the address book is populated with U.S. Presidents. Values are set for:
* first name
* last name
* photo
* phone number
* birthday

I’ll make it more robust in the future. But you may find this useful for now. The code might also be interesting if you’re learning how to program the address book.

Download: addressbookfill-10.tar.gz

Comments closed