If you’ve been using DEVONthink Pro for a while, chances are you’ve accumulated thousands of documents with a naming convention you’d now like to change. I recently found myself in this exact situation, and DEVONthink’s built-in Batch Process tool saved me hours of manual renaming.
My Use Case: Switching to ISO Date Format
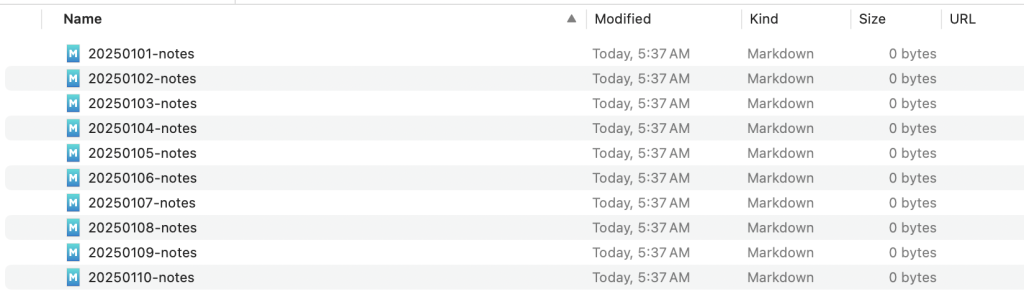
For years, I named all my notes and documents using the format YYYYMMdd-title, like 20250101-notes. It worked fine, but I eventually decided to switch to the ISO 8601 standard format: YYYY-MM-dd-title (e.g., 2025-01-01-notes). The hyphens between date components make it much easier to read at a glance.
The problem? I had thousands of documents in the old format.
Why Not Use Name Mangler?
On macOS, I typically use Name Mangler for batch renaming files in Finder. It’s a fantastic tool for filesystem operations. However, DEVONthink manages its own database, and renaming files through Finder doesn’t work the same way. I needed a solution that worked directly within DEVONthink.
Enter Batch Process.
What is Batch Process?
Batch Process is a powerful built-in tool in DEVONthink Pro that lets you apply a sequence of actions to multiple selected items. You can create reusable configurations for tasks you perform frequently, including renaming files using regular expressions.
Creating a Batch Process Configuration
Here’s how I set up a configuration to convert my date format:
Step 1: Select Files and Open Batch Process
- Select one or more files in DEVONthink that you want to rename
- From the menu, choose Tools > Batch Process > Batch Process…
Step 2: Create a New Configuration
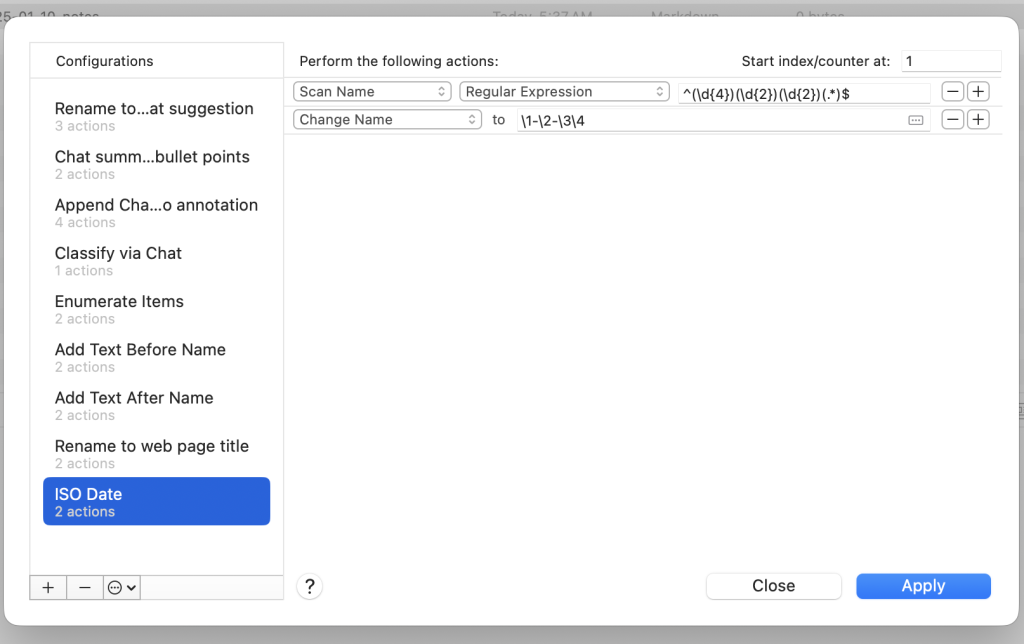
- In the Batch Process dialog, click the + button at the bottom left to create a new configuration
- Give it a descriptive name (I called mine “ISO Date”)
Step 3: Configure the Actions
You’ll need two actions to perform the rename:
Action 1 – Scan the filename: – Set the first dropdown to Scan Name – Set the second dropdown to Regular Expression – Enter the regex pattern: ^(\d{4})(\d{2})(\d{2})(.*)$
Action 2 – Change the filename: – Set the dropdown to Change Name – In the “to” field, enter: \1-\2-\3\4
Understanding the Regular Expression
Let me break down how this regex works:
| Pattern | Meaning |
|---|---|
^ | Start of the filename |
(\d{4}) | Capture group 1: exactly 4 digits (year) |
(\d{2}) | Capture group 2: exactly 2 digits (month) |
(\d{2}) | Capture group 3: exactly 2 digits (day) |
(.*) | Capture group 4: everything else (the title) |
$ | End of the filename |
The replacement pattern \1-\2-\3\4 then reconstructs the filename: – \1 = the year (2025) – - = literal hyphen – \2 = the month (01) – - = literal hyphen – \3 = the day (01) – \4 = the rest of the filename (-notes)
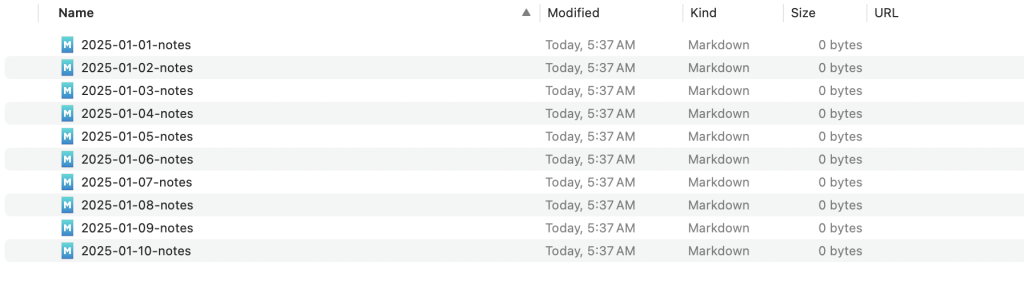
So 20250101-notes becomes 2025-01-01-notes.
Running the Batch Process
Once your configuration is saved, using it is simple:
Step 1: Select Files to Rename
Select the files you want to convert. You can select multiple files, an entire folder’s contents, or use DEVONthink’s smart groups to find all files matching your old naming pattern.
Step 2: Apply the Configuration
From the menu, select Tools > Batch Process > ISO Date (or whatever you named your configuration).
DEVONthink will process all selected files instantly.
Tips for Using Batch Process
- Test first: Always test your configuration on a few files before running it on your entire library
- Use Smart Groups: Create a smart group that matches files with the old naming pattern to easily find all files that need conversion
- Backup: While DEVONthink’s undo usually works, having a backup before major batch operations is always a good idea
- Reuse configurations: Your configurations are saved and appear in the Tools > Batch Process menu for quick access
Conclusion
DEVONthink’s Batch Process tool is incredibly powerful for bulk operations. What would have taken hours of manual renaming was accomplished in seconds. If you’re managing a large document library and need to make systematic changes, Batch Process is worth learning.
The combination of regular expression matching and sequential actions makes it flexible enough to handle complex renaming scenarios while remaining accessible through a graphical interface.
Comments closed