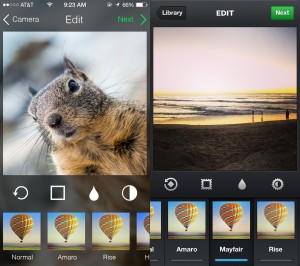
iOS 7 App Redesigns is a tumblr showing an iOS 7 redesign next to an iOS 6 design. Great site to get you think about how to update your own apps.
iOS 7 App Redesigns is a tumblr showing an iOS 7 redesign next to an iOS 6 design. Great site to get you think about how to update your own apps.
When running an Android Application, I found that it was only using half the screen as in the screenshot here.

I had this problem when the android:minSdkVersion was set to 3 in the AndroidManifest.xml
For example the following caused the issue:
<uses-sdk android:minSdkVersion="3" />
When I set it to something higher than 3, it used the whole screen. For example:
<uses-sdk android:minSdkVersion="8" />
![]()
My first Android App is in the App Store. WT411 Celebrity Gossip. It’s a mobile app for WT411.
Recent our front loading GE washer started leaking all over the floor. At first it was not obvious what was causing the leak. Eventually I found that the gasket on the door was torn and water was leaking through it.
After searching online, this appeared to be a common problem with front loading GE washers.
Our model number is: WH08X10036 Given this I search for the right part number. These sites were helpful:
http://searspartsdirect.com
http://appliancepartspros.com
http://repairclinic.com
And I found the part number I needed was: WH08X10036.
I found the part on Amazon: GE WH08X10036 Gasket for Washer
Installing it was not easy. Luckily I found this helpful video: http://www.appliance-repair-it.com/GE-front-loader-washer.html
Comments closed
For the past couple of months, I’ve been working on an iPhone app for the social networking site: mbuzzy.com. It just went live into the App Store. Check it out: mbuzzy.app
Comments closedHere’s an example to upload an image (or any data file) to a server:
– (void) uploadMediaForUserId: (NSString*) userId {
NSMutableDictionary *parameters = [NSMutableDictionary dictionaryWithObjectsAndKeys:
kAPIVersion, @"v",
nil];
// Media Name
if( TTIsStringWithAnyText(_mediaName)){
[parameters setObject:_mediaName forKey:@"n"];
}
// Media Description
if( TTIsStringWithAnyText(_mediaDescription)){
[parameters setObject:_mediaDescription forKey:@"d"];
}
// REST resource, where kMedia: @"/users/%@/media";
NSString *resource = [NSString stringWithFormat:kMedia, userId];
// Create the URL, where kServerURL is something like "http://www.dougdiego.com"
NSString *url = [kServerURL stringByAppendingFormat:@"%@?%@", resource, [parameters gtm_httpArgumentsString]];
// Resulting URL looks like: http://www.dougdiego.com/users/12345/media
TTURLRequest* request = [TTURLRequest requestWithURL:url delegate:self];
request.httpMethod = @"POST";
NSString * imageLocalUrl = [NSString stringWithFormat:@"documents://%@",_mediaFilename];
NSData *imageData = UIImageJPEGRepresentation(TTIMAGE(imageLocalUrl), 0.6);
// Set the media file with the parameter: file
[request addFile:imageData mimeType:@"image/jpeg" fileName:@"file"];
request.cachePolicy = TTURLRequestCachePolicyNoCache;
request.cacheExpirationAge = TT_CACHE_EXPIRATION_AGE_NEVER;
TTURLJSONResponse* response = [[TTURLJSONResponse alloc] init];
request.response = response;
TT_RELEASE_SAFELY(response);
[request send];
}
Comments closed
Need to implement Swipe to delete in your Three20 project? In order to do so, I added the 3 following methods to my datasource (TTListDataSource subclass):
– (BOOL) tableView: (UITableView *)tableView canEditRowAtIndexPath: (NSIndexPath *)indexPath {
return YES;
}
– (void)tableView:(UITableView *)tableView commitEditingStyle: (UITableViewCellEditingStyle)editingStyle forRowAtIndexPath:(NSIndexPath *)indexPath {
[tableView beginUpdates];
if (editingStyle == UITableViewCellEditingStyleDelete) {
// Make sure the row is there to delete
if([_myModel.messages count] >= indexPath.row){
// Get the object to delete
MyObject* myObject = [[_myModel.messages objectAtIndex:indexPath.row] retain];
// Remove the object, in my case this makes an API call
[self removeObjectById: myobject.id];
// Remove the object from the array
[_myModel.messages removeObjectAtIndex:indexPath.row];
// clean up
TT_RELEASE_SAFELY(myObject);
}
// Delete the row from the UITableView
[tableView deleteRowsAtIndexPaths:[NSArray arrayWithObjects:indexPath, nil] withRowAnimation:YES];
}
[tableView endUpdates];
}
– (NSInteger)tableView:(UITableView *)tableView numberOfRowsInSection:(NSInteger)section {
return [_myModel.messages count];
}
Note: before adding the numberOfRowsInSection method, I was getting NSInternalInconsistencyException errors.
Comments closedAre you releasing a flashlight app for the iPhone 4 or writing an application that use the capabilities of a certain device? Apple provides a UIKit Dictionary key called UIRequiredDeviceCapabilities for this purpose.
Apple define this key as: UIRequiredDeviceCapabilities (Array or Dictionary – iOS) lets iTunes and the App Store know which device-related features an application requires in order to run. iTunes and the mobile App Store use this list to prevent customers from installing applications on a device that does not support the listed capabilities.
You set this key in the Info.plist. Here is an example which tells the App Store that your app requires a camera flash. You can use this if your app only runs on the iPhone 4:
![]()
More: UIKit Keys
Comments closedNeed to use your own custom font? Or you want to support a certain font that isn’t on older iPhonts? Check out the project FontLabel.
To use FontLabel:
1. Get a copy of the project: https://github.com/zynga/FontLabel.git
2. Add the files to your project:

3. Add a font file to your project. You can find several free fonts here: http://www.webpagepublicity.com/free-fonts.html
4. In your AppDelegate, add the import:
#import “FontManager.h”
And then load the font file in the didFinishLaunchingWithOptions:
– (BOOL)application:(UIApplication *)application didFinishLaunchingWithOptions:(NSDictionary *)launchOptions {
// Load Custom Fonts
[[FontManager sharedManager] loadFont:@”FuturaBoldBT”];
}
In my example, I used the font “FuturaBoldBT.ttf
5. Finally create a FontLabel, which is just a subclass of UILabel:
-(void) displayMyLabel {
FontLabel * myLabel = [[FontLabel alloc] initWithFrame:CGRectMake(10, 30, 50, 30)
fontName:@”FuturaBoldBT” pointSize:26.0f];
myLabel.textAlignment = UITextAlignmentCenter;
myLabell.textColor = UIColor.whiteColor;
[myLabel setBackgroundColor:UIColor.clearColor];
[self addSubview:myLabel];
}
Comments closed
I recently started seeing this error in my Cocos 2d iPhone application running on iOS 4.1:
sgx error (background gpu access not permitted):

Program received signal: “SIGABRT”.
After searching around, I found this thread on the cocos2d forum.
I modified my code in the ApplicationDelegate to look like:
– (void)applicationDidEnterBackground:(UIApplication *)application
{
[[CCDirector sharedDirector] stopAnimation];
}
– (void)applicationWillEnterForeground:(UIApplication *)application
{
[[CCDirector sharedDirector] startAnimation];
}
– (void)applicationWillResignActive:(UIApplication *)application
{
[[CCDirector sharedDirector] pause];
}
– (void)applicationDidBecomeActive:(UIApplication *)application
{
[[CCDirector sharedDirector] resume];
}
This solved my problem. I hope it helps someone else.
Comments closed