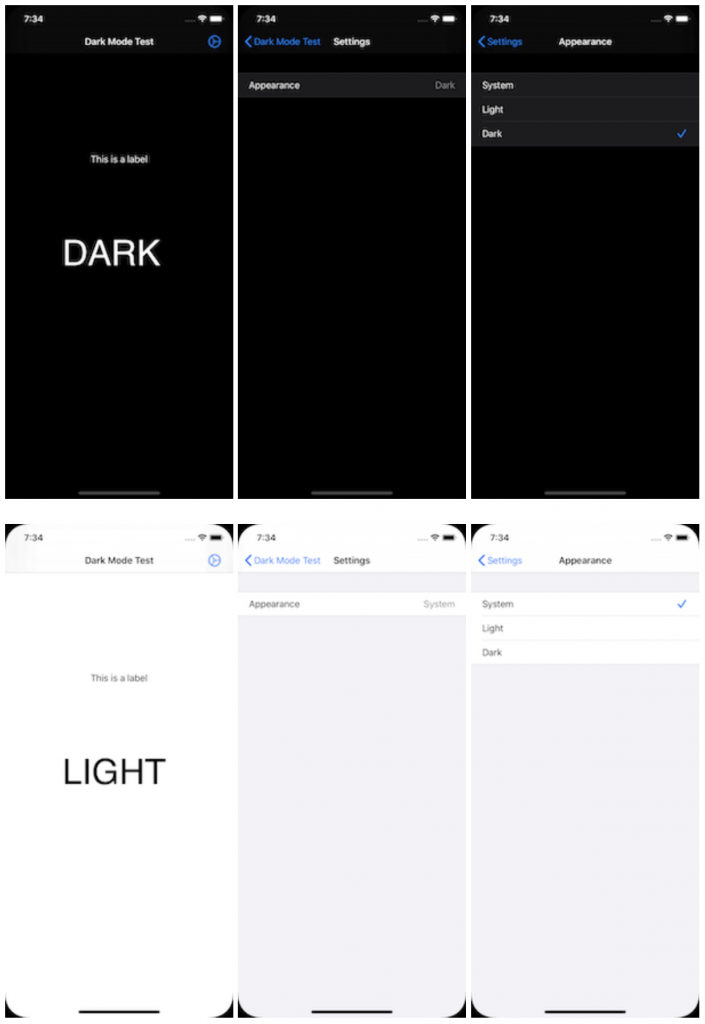
Here is a DarkModeDemo I created to play around with Dark Mode on iOS 13. I wanted to allow a user to override the system setting with dark or light. Maybe the users wants the system to be light but this particular app to be dark.
Screenshots:
Here is a DarkModeDemo I created to play around with Dark Mode on iOS 13. I wanted to allow a user to override the system setting with dark or light. Maybe the users wants the system to be light but this particular app to be dark.
Screenshots:
Frequently I’ll run into the case where my IDE (Intellij, Xcode/Vapor) will fail and leave a web server running on a port. I can’t start it again because it is already running. The only way to proceed is to restart your computer or find and kill the process.
To find the a process running on a port you can use the lsof command. You can filter with “-i”, which lists IP sockets.
$ lsof -i tcp:8080
The command will produce output like:
COMMAND  PID   USER   FD   TYPE             DEVICE SIZE/OFF NODE NAME
Run     8299 ddiego   15u  IPv6 0xb2782dc730d0c751      0t0  TCP localhost:http-alt (LISTEN)
The PID is the process identification number. You can pass this to the kill command to kill the process:
$ kill -9 8299
Here is a small function that will validate a US Zip Code using a Regexp with a: NSPredicate in Swift.
func validate(input: String?) -> Bool {
    guard let input = input else { return false }

    return NSPredicate(format: "SELF MATCHES %@", "^\\d{5}(?:[-\\s]?\\d{4})?$")
        .evaluate(with: input.uppercased())
}
Playground: zip-code-validation-playground
Comments closedCharles “is an HTTP proxy / HTTP monitor / Reverse Proxy that enables a developer to view all of the HTTP and SSL / HTTPS traffic between their machine and the Internet. This includes requests, responses and the HTTP headers (which contain the cookies and caching information).”
It is one of my favorite tools for debugging network applications. It supports Mac, Windows, Linux and even iOS.
The instructions on their website for SSL connections from within iPhone applications are not quite complete. Especially the last step which is tricky and I often forget. Here are complete instructions for SSL proxy connections on the iOS Simulator.
1. Add SSL Location. After launching Charles, open the menu:
Proxy > SSL Proxying Settings
The click the “Add Button”

Type in the location you want to add. You can use wildcards if you like. When you’re done, you should see you location in the list:

2. Install Charles Root Certificate in iOS Simulators. Open the menu:
Help > Install Charles Root Certificate in iOS Simulators

This will install the Charles Root Certificate on the Simulator.
3. Enable the Root Certificate. This is the step, they forget to document. And the last part of it is tricky.
On the Simulator, go to:
Settings > General > About > Certificate Trust Settings

Swipe the switch to enable the certificate. It will give a warning which you must choose “Continue”

You’ll be placed back on the Certificate Trust Settings page with the switch on:

Now is the critical part. Quit the Simulator. Now run your application again and Charles will be able to decrypt your network communications.
Comments closedStrava has a labs feature to convert a GPX file to a route: Strava GPX to Route.
But it doesn’t work for me:

And I’m not the only one:
Error computing Route when loading a GPX file
Here is a workaround for converting a GPX file to Strava Route:
1. Export the GPX file.
2. Go to GPSies and import your GPX file:

Verify it:

It adds a timing of 10 mph. You can change this, but it doesn’t matter.
3. Export the GPX Track file.

4. Go Strava and Upload Activity.

Click Choose File and select the GPX file exported from GPSies. This will create a new ride.
5. Save the activity as a route.


6. Delete the activity.

In iOS 7, Apple added an option to UIScrollView which could allow you to dismiss the keyboard when dragged.
UIScrollViewKeyboardDismissMode
public enum UIScrollViewKeyboardDismissMode : Int {


case none

case onDrag // dismisses the keyboard when a drag begins

case interactive // the keyboard follows the dragging touch off screen, and may be pulled upward again to cancel the dismiss
}
This is very easy to do. Just set the keyboardDismissMode property to .onDrag or interactive:
let tableView = UITableView(frame: .zero, style: .plain)
tableView.keyboardDismissMode = .interactive
You should set this on all tableviews that contain text fields.
For example code, see: https://github.com/dougdiego/iOSDemos
Comments closedI got this error when trying to build a Vapor project.
$ vapor build
No .build folder, fetch may take a while...
Fetching Dependencies [ • ]
Error: backgroundExecute(code: 1, error: "warning: \'fetch\' command is deprecated; use \'resolve\' instead\nerror: root manifest not found\n", output: "")
I recently experienced a lot of error with getting Vapor 3.0 to run during the beta and Swift 4.1. I assumed the error had to do with that. Had I read closer I might have figured it out. I was not in the build directory. Duh! After changing to the build directory everything worked fine.
If you end up on this page, make sure you are in the build directory when trying to build a Vapor project.
Comments closedI had a need to programmatically select a row in a UITableView. In order to do this, you have to do two things:
let indexPath = IndexPath(row: 0, section: 0)
self.tableView.selectRow(at: indexPath, animated: true, scrollPosition: .none)
self.tableView.delegate?.tableView!(self.tableView, didSelectRowAt: indexPath)
selectRow highlights the selected row and didSelectRowAt will call didSelectRowAt if you need to perform whatever action you defined.
For example code, see: https://github.com/dougdiego/iOSDemos
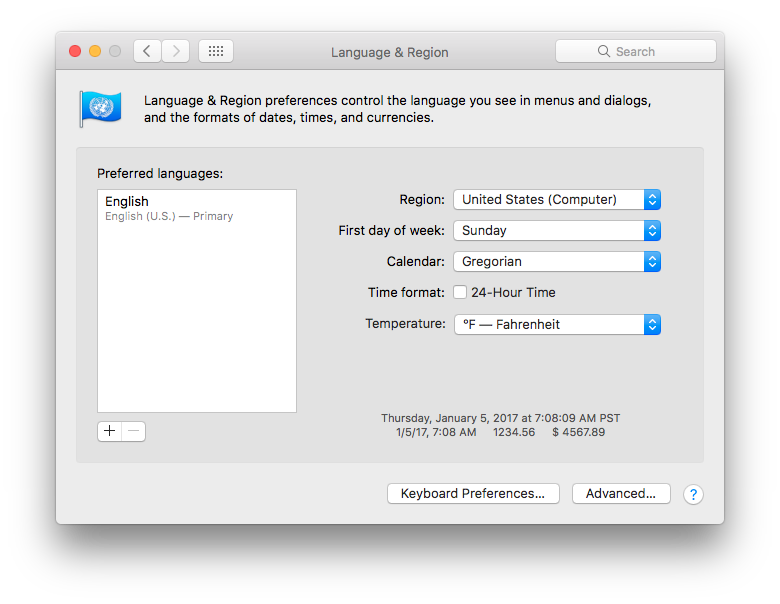
Comments closedmacOS has a feature that lets you change the word delimiter. By default it considers the “.” to be part of the word and selects the whole thing. But you can change it to break on the period.
This feature used to be called “Word Break” in previous macOS release. In macOS Sierra it can be found by going to “System Preferences” and selecting “Language & Region”. Here you’ll see an option for “Region”. If you’re in the United States, it should be set to “United States”. You can change it to “United States (Computer)”.
Here’s what’s happening: ASCII special characters that are part of words between alphabetic ASCII characters:
'.:_ in Standard'_ in English (United States, Computer)
Here is an example of “United States”
Here is an example of “United States (Computer)”
If you change the word break setting, you have to quit and reopen applications to apply the changes.
Note: I found this tip a few years ago and used it on my Mac. After getting a new Mac, it took me awhile to figure out how to do this again. This post is a reminder to myself for next time I need to remember how to do this.
Comments closedWhile working on a new Xcode project, I was unable to get my crash logs on Crashlytics . In the Crashlytics dashboard, I would see the following error:
"Found 1 unsymbolicated crash from missing dSYMs in 1 version in the last 24 hours"
Crashlytics even had a page dedicated to this: All about Missing dSYMs.
In my case the issue was with bitcode being enabled, which it is by default on all new iOS Projects. When bitcode is enabled, Apple recompiles your project on their server. Then you need to download the dSYMS to your computer and upload them to Crashlytics. This is a manual process that takes a lot of time. I was dreading doing this a second time after figuring out the process.
I figured this is something that fastlane might be able to help me with. Sure enough, they’ve come up with a lane to automate this. You can read more about it here:
Simply add this to your Fastfile:
lane :refresh_dsyms do
download_dsyms                  # Download dSYM files from iTC
upload_symbols_to_crashlytics   # Upload them to Crashlytics
clean_build_artifacts           # Delete the local dSYM files
end
Then run it like this:
fastlane refresh_dsyms
Thanks fastlane!
Comments closed